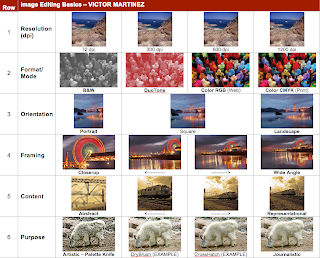
The objective for our assignment was to learn the basics of editing an image. We first began by looking at some photos from different websites. The website that I used to find my images were on Flickr. Its a website where people from around the world are able to upload images. I was able to search almost every kind of picture with different ranges of resolution and sizes.
The next step in completing the assignment was to select a photo and save it to the desktop. I found it easier to create a folder on the desktop and put all the saved photos in that one specific folder. Once saved I then opened up Photoshop with my desired image. The next thing I did was to locate the "image" button on the toolbar of photoshop and change the image size of the photo being used, select "image size" and change the height of the photo to one inch. The next step was to make sure the resolution was corresponding with each resolution in each column. The resolution can be changed under the same toolbar when changing the height of the image. These steps were then repeated for next three columns. Only changing to the desired resolution each time.
The next row was to change the Format/Mode of the my photo. Which is where I proceeded to use Flickr once again to find a new photo. I then saved my photo into my folder on my desktop and opened it up into photoshop. Like the first row I had to change the photos height to one inch. But for the second row we also had to change the mode of the photo. I changed the mode of the photo by going to the photoshop toolbar and clicking the "mode" button. Here was were I could see all the color formats: Grayscale, RGB, CMYK and Duotone. Each would change the mode of the photo. The only tricky part for this row was changing the photos mode to Duotone. In order to change the mode to Duotone, I had to first change the mode of the photo to grayscale, once changed to grayscale I could than make the photo Duotone.
For the third row I needed to change the orientation of another photo from Flickr. Once I opened the photo into photoshop. I had to click on the "crop" button on the toolbar to the left of the screen. Once "crop" was selected I then changed the height and width to my desired measurements. To Landscape the photo I had to change the width to 1.5 inches and left the height 1 inch. For the square orientation I left the dimensions both the same as 1 inch. The last orientation was portrait. I had to change the dimensions of the width to .75 inches and left the height at 1 inch.
For the fourth row I had to continue cropping my photo taken off of Flickr. It was a photo of the Pier. I had to crop so that it would close up on a certain part of the photo. in this case i chose to close up on the Ferris Wheel because it was the highlight of the photo. Then came fifth row which was almost identical to the fourth only difference was that i had to close in on the a different photo and close in so that the photo looks abstract. For this row i chose a train, the final image could not be identified as a train any longer.
And finally for the sixth row, which was the easiest and most amusing row of the six. I had to experiment with different filters for a different photo, which i chose to use a Ram. To change the filters i simply went to the top menu and selected the different filters I needed. I used Crosshatch, Drybrush, and Pallete Knife filters.
With this project it helped me with remember and sharpen my memmory on the basics of photoshop and I had fun doing it.
No comments:
Post a Comment